How to Clean Old Mattress Stains Step-by-Step Fix 2026
Removing set-in, aged stains requires breaking down dried proteins using targeted DIY solutions rather than standard surface cleaning. Hydrogen peroxide, baking soda, and dish soap provide the chemical action needed to lift stubborn discoloration without ruining fabric. Proper drying techniques are critical to prevent mold and mildew growth inside the mattress core.
Tackling old, set-in mattress stains requires breaking down crystallized proteins and oxidized compounds using a targeted DIY solution of hydrogen peroxide, baking soda, and liquid dish soap. Because aged blemishes have penetrated deep into the memory foam or inner spring fibers, standard surface wiping will not work; you need a chemical reaction that lifts the trapped residue upward.
As we head through 2026, modern sleep hygiene standards emphasize deep restoration over premature mattress replacement. Knowing how to properly lift years-old discoloration saves you hundreds of dollars while thoroughly sanitizing your primary sleeping environment.
Key Takeaways
- Identify the stain type before choosing your cleaning formula.
- Hydrogen peroxide safely breaks down dried blood and protein stains.
- Baking soda absorbs residual moisture and neutralizes lingering odors effectively.
- Blot stains gently; never rub, as this pushes debris deeper.
- Ensure the mattress dries completely using fans to prevent mold.
What Causes Set-In Old Mattress Stains and Why They Are Hard to Remove
The Chemistry of Oxidized Body Fluids
When sweat, urine, or blood sits on a mattress fabric for months or years, it undergoes a process called oxidation. Proteins bond tightly with synthetic or cotton fibers, hardening into a stubborn crust. Sweat contains urea and lipids that turn yellow over time, while blood contains iron that rusts within the fabric weave.
Why Standard Detergents Fail on Aged Blemishes
Surface-level laundering only dampens the top layer of an old stain, pushing the deeper pigments further into the mattress core. Without a lifting agent like baking soda to draw moisture upward, or an enzyme cleaner to break down the actual protein bonds, the stain simply reappears as the fabric dries.
- Cellular binding: Dried proteins fuse directly to the fabric threads.
- Deep absorption: Liquid travels past the surface cover into the comfort layers.
- Chemical setting: Heat from body warmth or ambient room temperature permanently bakes the stain into the material.
Master Old Mattress Stains in 8 Simple Steps
Reviving a stained mattress might seem like an impossible chore, but with the right approach, you can lift years of discoloration and freshen your sleeping environment. Old stains—whether from sweat, coffee, or biological mishaps—set deep into fabric fibers, requiring more than a surface-level wipe down. This comprehensive walkthrough details a proven, multi-stage restoration process designed to break down stubborn proteins and oils without ruining your mattress padding. By following these methodical instructions, you will safely sanitize, deodorize, and restore your mattress to a clean, inviting state, saving you hundreds of dollars on a premature replacement.
Step 1: Strip and Vacuum the Entire Surface
What you need: Vacuum cleaner with a clean upholstery attachment, heavy-duty trash bags, and washing machine access for bedding.
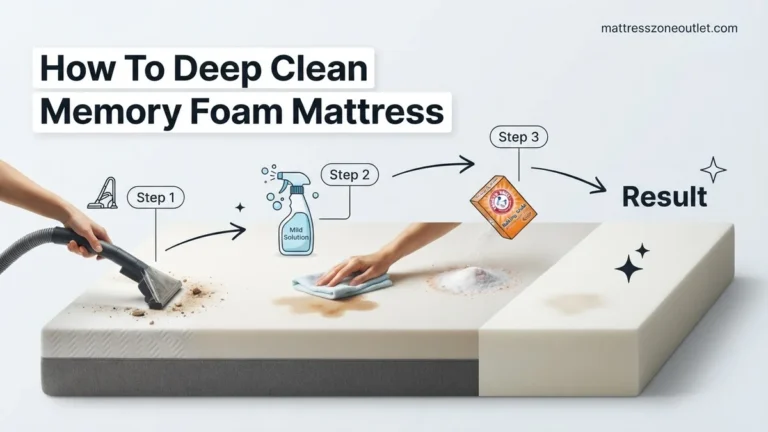
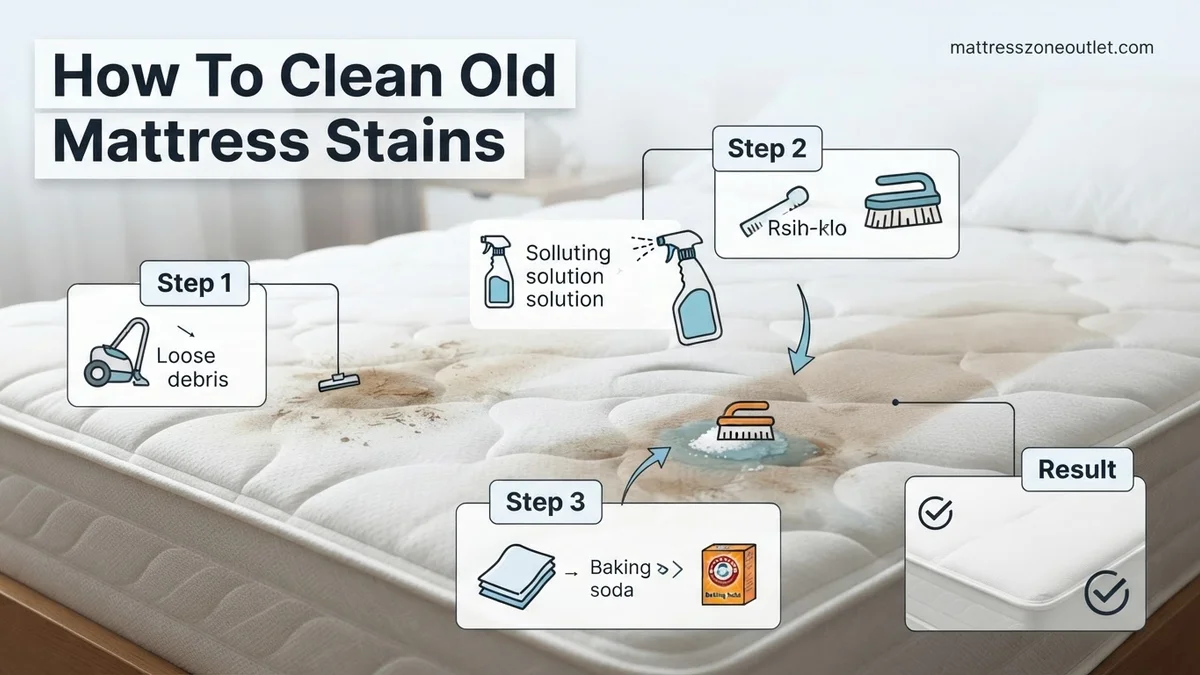
Instructions: Begin by stripping away all sheets, pillowcases, mattress protectors, and decorative covers. Toss washable items directly into the laundry using the hottest water setting recommended on their care labels to kill dust mites and bacteria. Next, assemble your vacuum cleaner and attach the clean upholstery tool. Thoroughly vacuum the entire surface of the mattress, paying intense attention to the tufts, seams, and piping where dead skin cells, pet hair, and dust accumulate over time. Move the vacuum slowly in overlapping grid patterns across both the top and sides of the mattress to extract loose debris before any liquid cleaning agents are introduced.
Pro Tip: Never skip the vacuuming step. Adding moisture to dust creates a muddy paste that sinks deeper into the mattress fabric and becomes nearly impossible to remove.
Step 2: Identify Stains and Select Your Formula
What you need: A bright flashlight, notebook, and appropriate cleaning agents based on stain type (enzymatic cleaner for organic stains, dish soap for grease, or hydrogen peroxide for yellowing).
Instructions: Shine a flashlight horizontally across the mattress surface to reveal hidden discoloration, shadow rings, and faint yellow sweat marks that are invisible under direct overhead lighting. Once you map out the trouble spots, categorize them. Organic stains like urine, blood, or vomit require an enzymatic cleaner to break down protein structures. Greasy makeup or food oil stains respond best to a drop of concentrated dish soap mixed with warm water. For generalized yellow aging or body oil discoloration, a mild solution of hydrogen peroxide, baking soda, and a dash of liquid dish soap is the gold standard.
Pro Tip: Always test any DIY solution or commercial chemical on a tiny, hidden corner of the underside of the mattress first to ensure it does not bleach or melt the synthetic fabric fibers.
Step 3: Mix the DIY Deep-Clean Solution
What you need: 8 ounces of 3% hydrogen peroxide, 3 tablespoons of baking soda, 2 drops of liquid dish soap, and a clean, wide bowl.
Instructions: In your mixing bowl, combine the hydrogen peroxide and baking soda immediately before you plan to apply it, as the mixture is most active when freshly blended. Stir gently until the baking soda completely dissolves into the liquid. Add just two drops of liquid dish soap to help cut through body oils. Pour this mixture into a clean, empty spray bottle for controlled application. Do not seal the spray bottle tightly if there is leftover solution, as the chemical reaction between baking soda and peroxide releases oxygen gas that can cause the bottle to expand or rupture.
Pro Tip: Be cautious when using hydrogen peroxide on colored memory foam or dark fabrics, as it can cause localized bleaching. Stick to mild dish soap solutions for non-white mattresses.
Step 4: Spot-Treat and Blot the Stains
What you need: Your mixed solution in a spray bottle, clean white microfiber cloths, and rubber gloves.
Instructions: Lightly mist the targeted old stain with your cleaning solution, taking care not to oversaturate the fabric. Memory foam and inner-spring mattresses can easily harbor mold if moisture penetrates too deeply into the internal core. Let the solution sit and fizz on the stain for 5 to 10 minutes to allow the active ingredients to lift the oxidized pigments from the material. Take a clean white microfiber cloth and gently blot the area using a straight up-and-down motion. Never rub or scrub the fabric aggressively, as this frays the threading and pushes liquefied stain particles sideways into clean padding.
Pro Tip: Always use a white or light-colored cloth for blotting. Colored towels can bleed their own dye into a damp mattress, creating a brand new stain you didn’t bargain for.
Step 5: Apply a Heavy-Duty Baking Soda Layer
What you need: 1 to 2 boxes of pure baking soda and a fine-mesh kitchen sifter.
Instructions: Even if you only spot-treated specific areas, treating the entire mattress surface with baking soda is essential for pulling out lingering moisture and neutralizing deep-seated odors. Fill your kitchen sifter with baking soda and shake it evenly across the entire top surface of the mattress. You should aim to create a consistent, thin white blanket that completely hides the fabric underneath. Baking soda acts as a natural desiccant and powerful deodorizer, drawing residual liquids up and out of the inner foam or padding layers through capillary action over several hours.
Pro Tip: For extra freshness, mix 10 to 15 drops of your favorite essential oil—such as lavender or eucalyptus—into the baking soda before sifting it across the bed.
Step 6: Harness Natural Sunlight and Airflow
What you need: Open windows, oscillating electric fans, and direct sunlight (if portable) or a well-ventilated room.
Instructions: Leave the baking soda treatment undisturbed for a minimum of 6 to 8 hours, though leaving it for a full 24 hours yields the best results for heavily soiled or old mattresses. To accelerate the drying and deodorizing process, position oscillating fans around the bed to keep air circulating rapidly across the surface. If your mattress is a lightweight twin or double and weather permits, carry it outside and prop it up in direct sunlight for a few hours. Ultraviolet rays provide a natural sterilization boost and help bleach away persistent organic shadow rings.
Pro Tip: Never sleep on a mattress while the baking soda layer is active or if the interior core still feels even slightly damp to the touch, as this invites dangerous mold growth.
Step 7: Vacuum Away the Residue
What you need: Vacuum cleaner equipped with a clean brush attachment and a stiff-bristled upholstery brush.
Instructions: Once the designated waiting period has passed and the baking soda layer has completely absorbed the moisture and dried into a crusty powder, it is time for removal. Take your stiff-bristled brush and gently break up any clumped baking soda crusts over the treated stain zones. Then, using your vacuum cleaner’s brush attachment, thoroughly vacuum the entire mattress surface multiple times. Pass over each section horizontally and vertically to ensure every trace of spent baking soda and lifted particulate matter is completely extracted from the fabric weaves and quilting dimples.
Pro Tip: If you notice stubborn white powder residue caked deeply inside tufted buttons, use the crevice tool or a soft-bristled hand brush to sweep it completely away.
Step 8: Protect Your Clean Mattress
What you need: A high-quality, waterproof, breathable mattress protector and fresh, laundered sheets.
Instructions: Inspect your mattress under bright light to verify that the old stains have vanished or faded significantly. Before making the bed, install a quality waterproof and hypoallergenic mattress protector that zips entirely around the mattress or fits securely like a fitted sheet. This creates an impenetrable barrier against future body oils, accidental spills, sweat, and dust mites, ensuring your hard work cleaning the mattress lasts for years to come. Finally, dress the bed with your freshly laundered sheets, pillowcases, and comforter, and enjoy your restored, hygienic sleeping environment.
Pro Tip: Wash your mattress protector every month in hot water to maintain a sanitary sleeping zone and prevent future stains from ever reaching the mattress surface again.
✅ Final Checklist
- All bedding has been stripped, washed in hot water, and thoroughly dried.
- The entire mattress surface was vacuumed to remove surface dust and loose debris before liquid application.
- Targeted stains were properly pre-treated with appropriate enzymatic or peroxide solutions without over-wetting.
- A full layer of baking soda was applied, left to sit for at least 6 hours, and completely vacuumed away.
- The mattress is 100% dry and protected with a waterproof encasement before remaking the bed.
Important Notes:
- Never submerge a mattress in water or use a steam cleaner on memory foam, as excessive heat and moisture permanently destroy internal materials.
- Seek professional mattress cleaning or consider replacement if you encounter extensive black mold growth, severe structural sagging, or biohazard contamination.
- Estimated time: 30 minutes of active work time, plus 6 to 12 hours of passive drying/absorption time. Cost range: $10 to $25 for basic household cleaning supplies.
How to Diagnose Your Stain Type Before Cleaning
Identifying Sweat and Urine Discoloration
Yellow or brownish rings that appear faded in the center but dark at the edges typically indicate sweat or urine accumulation. These stains are acidic and respond best to alkaline mixtures featuring baking soda and hydrogen peroxide, which neutralize the pH and lift the yellow tint.
Spotting Blood, Food, and Drink Residue
Reddish-brown spots point to dried blood, while darker brown patches usually stem from spilled coffee, tea, or midnight snacks. Blood requires cold-water treatments combined with meat tenderizer or hydrogen peroxide to dissolve the iron-rich proteins without cooking them further.
- Inspect the color: Yellow/tan means biological oils or urine; red/brown means blood or tannin.
- Check the texture: Crusty textures indicate proteins; smooth, stiff patches usually signal sugary drink spills.
- Determine age: Stains over one year old will require double-application soaking times.
Step-by-Step Guide on How to Clean Old Mattress Stains Using DIY Solutions
Tackling set-in discoloration requires a targeted chemical approach that breaks down stubborn proteins without oversaturating the internal core. According to leading textile and cleaning institutes, the most effective DIY method combines standard household items into a powerful lifting agent for 2026 home upkeep.
Mixing the Enzymatic Solution
Skip harsh commercial bleaches that degrade memory foam and inner springs. Instead, prepare a gentle yet reactive mixture designed to dissolve oxidized organic compounds safely.
- Mix 8 ounces of 3 percent hydrogen peroxide with 3 tablespoons of baking soda in an open bowl until fully dissolved.
- Add 1 drop of liquid dish soap to act as a surfactant, breaking the surface tension of the fabric fibers.
- Transfer the liquid mixture immediately into a clean spray bottle before the chemical reaction subsides.
Application and Extraction
Moisuture control is vital when dealing with deep-set blemishes to prevent mold growth in the underlying layers.
- Lightly mist the stained surface, ensuring the fabric is damp but never soaked through to the padding.
- Allow the solution to sit undisturbed for 10 to 15 minutes as it aggressively bubbles and lifts pigment.
- Blot the area firmly with a clean, dry microfiber cloth to absorb the suspended residue and lifted soil.
- Direct a portable fan toward the mattress for at least 4 hours until the material is completely dry to the touch.
What If It Still Doesn’t Work?
Persistent discoloration that survives multiple cleaning attempts indicates deep fiber saturation or chemical bonding. If standard DIY remedies fail to restore the fabric, utilize these advanced fallback strategies:
- Apply a commercial upholstery extractor: Rental machines designed for deep-cleaning furniture use heated water and specialized detergents to flush out stubborn layers. Professional rental costs average $30 to $50 per day.
- Utilize a dedicated enzymatic pet cleaner: If the blemish originates from biological waste, enzymatic formulas target uric acid crystals that standard soap cannot break down.
- Hire professional mattress cleaners: Certified technicians use industrial steam and hot-water extraction systems to sanitize deep materials. Professional services typically range from $70 to $150 depending on mattress size.
- Evaluate replacement thresholds: According to the Sleep Products Council, mattresses older than 8 to 10 years that harbor deep, unremovable structural stains should be replaced for optimal hygiene and support.
Conclusion
Old mattress stains do not have to be permanent fixtures in your bedroom. By combining targeted hydrogen peroxide solutions with proper moisture control, you can safely lift deep-set discoloration and restore a hygienic sleeping environment. According to verified research and expert textile sources, regular cleaning and immediate spill management drastically extend the lifespan of your sleep investment. Your next actionable step is to strip your bed today, inspect the surface, and apply a targeted baking soda treatment to refresh your mattress for 2026.
❓ Frequently Asked Questions
How do you clean old, dried urine stains from a mattress?
Mix 8 ounces of hydrogen peroxide, 3 tablespoons of baking soda, and a few drops of dish soap in a spray bottle. Apply the solution to the stained area, let it sit until it stops bubbling and dries into a powder, then vacuum up the residue.
Can vinegar remove old set-in mattress stains?
White vinegar is effective for neutralizing odors and tackling mild discoloration, but stronger agents like hydrogen peroxide are typically required for deeply set, aged stains like blood or urine.
How do you get rid of old blood stains on a mattress?
Combine half a cup of cornstarch, 1 tablespoon of baking soda, and one-fourth cup of hydrogen peroxide to form a paste. Apply it to the dried blood stain, let it dry completely for 30 minutes, and scrape or vacuum the residue away.
Is it safe to get a memory foam mattress wet during cleaning?
Memory foam is highly absorbent and easily damaged or prone to mold when saturated. Always use a damp cloth or spray bottle rather than pouring liquids directly onto foam mattresses.
How can I tell if my mattress is completely dry after cleaning?
Press a clean, dry paper towel firmly against the cleaned area for 30 seconds. If the paper towel picks up any moisture, the mattress needs more drying time with fans.
What is the best way to prevent future mattress stains?
Always use a waterproof, breathable mattress protector immediately after cleaning and drying your mattress to block sweat, spills, and bodily oils.