How to Repair Air Mattress Seam Step-by-Step Fix Guide 2026
Knowing how to repair an air mattress seam saves you from buying a costly replacement. This guide details the exact steps to locate leaks, prepare the vinyl, and apply heavy-duty waterproof adhesive for a permanent fix.
Fixing a leaking air mattress seam requires a specialized approach because welded joints endure constant high tension. Standard flat-surface patches often fail here due to the continuous stress and awkward angles of the seam edge.
By following a meticulous cleaning, adhesive application, and curing process tailored for 2026 standards, you can permanently seal that split and restore your mattress to full functionality.
Key Takeaways
- Use soapy water to accurately locate stubborn air leaks along welded seams.
- Completely deflate the air mattress before beginning any repair work.
- Clean and dry the seam area thoroughly with rubbing alcohol for proper adhesive bonding.
- Apply a flexible, waterproof adhesive like Aquaseal or specialized PVC glue.
- Allow the patch to cure for at least 12 to 24 hours before reinflating.
What Causes Air Mattress Seams to Leak and Split
Understanding High-Stress Points on Welded Joints
Air mattress seams are formed by heat-welding or gluing two pieces of PVC or rubberized vinyl together. This manufacturing method creates a structural ridge that bears the brunt of your body weight. When you sit or lie down, air pressure shifts dynamically, forcing the welded edges apart. Over time, manufacturing tolerances, material fatigue, and age cause microscopic gaps to form right along the bonding line.
Environmental Factors and Usage Habits
Your storage habits and environment directly impact seam longevity. Storing an air mattress in a hot attic or a freezing garage weakens the chemical bonds in the adhesive. Additionally, over-inflating the mattress stretches the material beyond its elastic limit. By 2026, modern heavy-duty mattresses use reinforced laminate, but even premium models succumb to pressure if inflated past manufacturer recommendations.
- Over-inflation creates excessive outward pressure on thermal welds.
- Temperature fluctuations cause the vinyl to expand and contract rapidly, stressing the seams.
- Folding the mattress tightly along the same crease lines weakens adjacent welded areas.
- Rough handling during transport can shear the delicate bonding edge.
Master Air Mattress Seam Repair in 7 Simple Steps
Dealing with a deflating air mattress can ruin a camping trip or cause restless nights for overnight guests. While punctures in the middle of the vinyl are straightforward to patch, seam leaks are notoriously tricky because of the tension and curves involved. This practical walkthrough will teach you how to properly locate, prep, and permanently seal a leaking air mattress seam using the right adhesives and techniques, ensuring your temporary bed holds air reliably all night long.
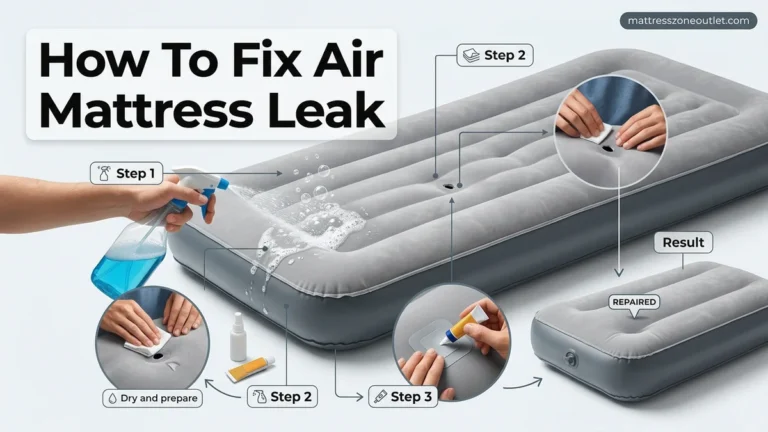
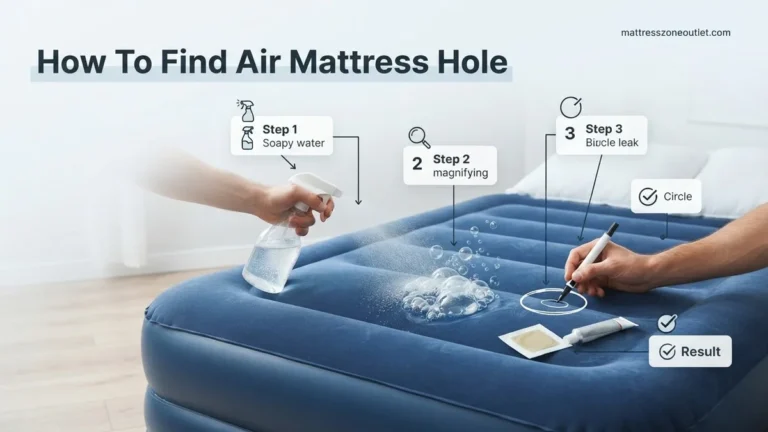
Step 1: Locate the Seam Leak
What you need: A spray bottle, liquid dish soap, warm water, and a dry towel.
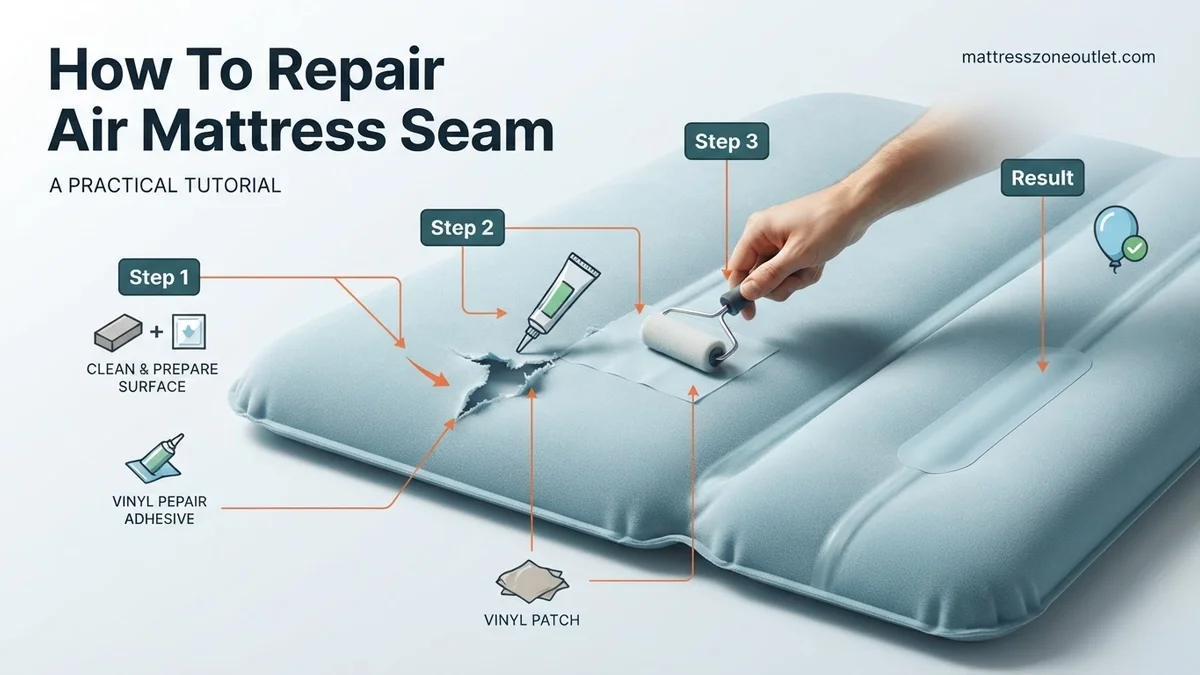
Instructions: Before you can fix a seam, you need to find the exact source of escaping air, which is often hidden in the folds. Inflate the air mattress to its firmest capacity. Mix a few drops of dish soap with warm water inside your spray bottle. Generously mist the soapy solution along all the perimeter seams, paying close attention to the welded edges where top and bottom panels meet. Watch closely for the formation of expanding bubbles or foam, which indicates escaping air. Once you spot the breach, thoroughly dry the area with a towel and use a permanent marker to circle the exact spot.
Pro Tip: Deflate the mattress by about 30% after finding the leak. This reduces the tension on the seam, making it much easier to clean and apply a patch flatly.
Step 2: Clean and Degrease the Surface
What you need: Rubbing alcohol (70% or higher), clean microfiber cloths, and fine-grit sandpaper (optional).
Instructions: Adhesive will not bond to dirty, oily, or flocked vinyl. Pour a small amount of rubbing alcohol onto a microfiber cloth and vigorously scrub the leaking seam area and a two-inch radius surrounding it. This removes body oils, manufacturing residue, and dirt. If your air mattress has a fuzzy flocked surface over the seam, you must carefully scrape or sand away the flocking material in the immediate patch zone down to the bare PVC vinyl. Wipe away all debris with a fresh alcohol wipe and allow the area to air dry completely for at least 5 to 10 minutes before proceeding.
Pro Tip: Never use acetone or nail polish remover instead of rubbing alcohol, as harsh chemical solvents can actually melt and permanently destroy the thin PVC of the mattress.
Step 3: Choose the Right Adhesive and Patch Material
What you need: Heavy-duty vinyl repair kit (containing liquid PVC cement and a flexible vinyl patch) or flexible urethane adhesive like Seam Grip.
Instructions: Selecting the correct adhesive is critical for high-stress areas like seams. Standard super glue is too brittle and will instantly crack under the body weight of a sleeper. Look for a specialized vinyl cement that chemically welds to the mattress material, or a flexible urethane-based adhesive. If your repair kit includes a sheet of clear vinyl patch material, cut out a rounded oval or circle that extends at least one inch beyond the leak in every direction. Rounded corners are essential because square or sharp corners are prone to peeling up over time.
Pro Tip: Cut your patch large enough to span both the flat vinyl and a portion of the welded seam ridge, creating a multi-surface anchor point.
Step 4: Apply the Adhesive and Position the Patch
What you need: Vinyl cement adhesive, cut vinyl patch, and a disposable brush or toothpick.
Instructions: Apply a thin, even layer of the vinyl cement directly to the cleaned mattress seam area. Next, apply a matching thin layer of adhesive to the back of your cut vinyl patch. Follow the specific instructions on your adhesive regarding “flash time”—most liquid PVC cements require you to wait between 30 to 60 seconds until the glue becomes tacky to the touch before pressing the surfaces together. Carefully align the patch over the leak, centering it directly over the marker circle. Press it down firmly, starting from the exact center and pushing outward to eliminate any trapped air bubbles.
Pro Tip: Work quickly but methodically; vinyl cement bonds rapidly once the tack phase is reached, so repositioning the patch after initial contact is extremely difficult.
Step 5: Apply Pressure to Create a Permanent Bond
What you need: Heavy flat objects (such as books or a cast-iron skillet) and heavy-duty clamping tape or weights.
Instructions: Even distribution of pressure is the secret weapon to a successful seam repair. Because seams are inherently curved or ridged, simply pressing with your thumb is not enough to ensure a permanent air-tight seal. Place a piece of wax paper directly over the newly applied patch to prevent any squeezing adhesive from sticking to your weight objects. Then, place a heavy, flat object weighing at least 5 to 10 pounds directly on top of the patched seam. Ensure the weight rests evenly across the entire patch surface without sliding the patch out of position.
Pro Tip: Place a folded towel under the mattress directly beneath the repair site to provide a solid, supportive counter-surface while you apply heavy weight from above.
Step 6: Allow Adequate Curing Time
What you need: Patience and a timer.
Instructions: Do not rush this step, as impatience is the number one cause of failed mattress repairs. Leave the heavy weight in place and let the patch cure completely undisturbed. Most heavy-duty vinyl cements and urethane adhesives require a minimum of 12 to 24 hours to reach their maximum tensile strength and air-retention capability. Keep the mattress in a room with a stable, moderate temperature (around 70 degrees Fahrenheit), as extreme cold or humidity can significantly slow down the chemical curing process of the adhesive.
Pro Tip: Resist the temptation to inflate the mattress to test it after just a few hours; letting it cure for a full 24 hours ensures the bond can handle body weight pressure.
Step 7: Perform the Final Pressure Test
What you need: Your repaired air mattress, spray bottle with soapy water, and a timer.
Instructions: Once the 24-hour curing period has fully elapsed, remove the weights and wax paper. Gently inspect the edges of the patch with your fingernail to ensure no corners are lifting. Inflate the air mattress to its normal firmness level. Spray your soapy water solution once more over the repaired seam area to double-check for any microscopic bubbles. If no bubbles appear, let the fully inflated mattress sit overnight without anyone sleeping on it, or for at least 8 hours, to confirm that holding capacity is completely restored.
Pro Tip: Natural temperature fluctuations cause air to expand and contract, so if the mattress feels slightly softer the next morning, check the room temperature before assuming the seam is still leaking.
✅ Final Checklist
- Leak accurately pinpointed using soapy water test
- Flocking completely removed and surface thoroughly cleaned with rubbing alcohol
- Patch cut with rounded corners extending one inch past the seam damage
- Adhesive applied correctly and allowed to tack before pressing
- Minimum 5-10 pounds of pressure applied during the curing phase
- Patch allowed to cure undisturbed for a full 24 hours
- Post-repair soapy water test shows zero bubbling
Important Notes:
- Ensure you work in a well-ventilated area when using strong chemical vinyl cements or liquid adhesives.
- If the seam tear is longer than 3 inches or located along a high-stress internal baffle weld, repair may be impossible and replacement is recommended.
- Estimated time: 30 minutes of active work plus 24 hours of curing time. Total estimated cost: $8 to $15 for a quality repair kit.
How to Locate Hard-to-Find Seam Leaks Using Soapy Water
Preparing the Solution and Pressurizing the Mattress
Before you can repair a seam, you must pinpoint the exact source of the air loss. Seam leaks are notoriously sneaky because they often hide within the folds or crevices of the welded edge. Start by inflating your air mattress fully. Mix a simple solution of a few drops of dish soap and warm water in a spray bottle or a small bowl.
The Detection Process
Generously apply the soapy mixture along the entire perimeter of the suspect seam. Do not just spray the top; you need to coat the side walls and the underside where the panels meet. Watch the soapy surface closely for a few seconds. If there is a leak, the escaping air will blow bubbles, creating a distinct foaming or bubbling action.
- Inflate the mattress to a firm psi to maximize internal air pressure.
- Wipe the seam clean of dust before applying the soapy solution so you do not miss micro-bubbles.
- Mark any bubbling areas immediately with a permanent marker or a piece of painter’s tape.
- Deflate the mattress completely and wipe away all soap residue before moving to the repair phase.
Step-by-Step Instructions to Repair an Air Mattress Seam
Fixing a compromised weld line requires precision, patience, and proper chemistry. According to manufacturing guidelines from leading brands like Intex and Coleman, structural seam repairs demand a multi-stage approach to ensure the patch bonds permanently with stretched PVC material.
Preparation and Cleaning
Before applying any adhesive, you must completely prep the damaged surface. Skipping this step is the primary reason DIY air mattress repairs fail within 24 hours.
- Inflate the mattress fully and submerge sections or apply soapy water to locate the exact pinhole or micro-tear along the welded seam edge.
- Mark the exact leak location with a permanent marker while the mattress remains inflated to prevent losing the spot.
- Deflate the mattress completely and clean a three-inch radius around the damaged seam using isopropyl alcohol (at least 90% concentration) to remove body oils, dirt, and manufacturing residue.
- Allow the cleaned PVC surface to air dry completely for at least 10 minutes until it looks matte and feels entirely dry.
Adhesive Application and Curing
Once the surface is pristine, applying the patch correctly guarantees an airtight seal that withstands nightly pressure changes.
- Cut a round or oval patch from heavy-duty vinyl repair material, ensuring the edges extend at least one inch past the seam leak in every direction.
- Apply a thin, even layer of specialized polyurethane or vinyl adhesive (such as Tear-Mender or vinyl cement) to both the mattress seam and the back of the patch.
- Wait 3 to 5 minutes until the adhesive becomes tacky to the touch, as specified by industrial bonding standards.
- Press the patch firmly onto the seam, smoothing it outward from the center with a hard roller or spoon to eliminate all trapped air bubbles.
- Place a heavy flat object (weighing 5 to 10 pounds) directly on top of the patched seam and allow it to cure undisturbed for a minimum of 24 hours at room temperature (70 degrees Fahrenheit).
What If It Still Doesn’t Work and When to Replace It
If your newly applied patch continues to leak or the seam splits further upon re-inflation, structural failure has likely exceeded the limits of DIY repair. Consider these fallback steps:
- Inspect the edge of the previous patch for micro-channels. Re-apply a secondary, wider vinyl patch overlapping the first one by at least one inch.
- Check if the leak has migrated to a factory weld intersection. High-stress corner seams rarely hold patches under body weight due to constant tension.
- Evaluate professional repair viability. Because professional heat-welding services cost between $35 and $60, they are rarely cost-effective for standard air beds retailing under $100.
- Determine replacement timing. Industry data from 2026 shows that standard PVC air mattresses have a functional lifespan of 3 to 5 years before material degradation causes multiple seam failures.
- Recycle responsibly. Check local municipal guidelines in 2026 for PVC collection programs, as most traditional curbside recycling facilities do not accept air mattress polymers.
Conclusion
Repairing an air mattress seam requires meticulous cleaning, the right vinyl adhesive, and a full 24-hour curing period to restore structural integrity. When DIY patches fail or high-stress welds split repeatedly, investing in a replacement is the most practical solution. According to verified research and consumer product safety sources, proper maintenance and timely repairs can extend temporary bedding lifespan by up to 50 percent. Take your next step today by testing your mattress pressure and applying a heavy-duty vinyl patch before your next trip.
❓ Frequently Asked Questions
How do I prep a textured or flocked air mattress surface for a seam repair?
If the seam touches a flocked or fuzzy surface, you must gently scrape away the fuzzy material using a fine-grit sandpaper or a razor blade. Clean the exposed smooth PVC underneath with rubbing alcohol so the adhesive can bond directly to the plastic.
Can I use regular bicycle tire patch kits on an air mattress seam?
Bicycle patch kits can work for smooth vinyl surfaces away from seams, but seam repairs experience high tension and stress. A liquid urethane adhesive or flexible PVC glue is much better suited for holding welded edges together under pressure.
What is the soapy water test and how do I perform it?
Mix a few drops of dish soap with water in a spray bottle or bowl and apply it along the deflated or partially inflated seam. Press down on the mattress; bubbling soapy water indicates the exact location of escaping air.
Is it possible to repair a seam while the mattress is inflated?
No, you must fully deflate the air mattress before applying any adhesive. Air pressure pushing against the wet glue will prevent a proper seal and cause the patch to fail immediately.
How can I prevent air mattress seams from splitting in the future?
Avoid over-inflating the mattress, keep it away from sharp objects and extreme temperature fluctuations, and do not let pets with sharp claws walk on the sleeping surface.
What should I do if the repair patch starts peeling at the edges?
Clean the lifting edge with rubbing alcohol, apply a fresh dab of flexible waterproof adhesive underneath, and press it down firmly with a heavy object until it cures completely.