How to Find Air Mattress Hole Step-by-Step Fix Guide 2026
A deflating air bed ruins a good night’s sleep, but you can easily track down sneaky punctures using targeted detection techniques. The soapy water spray test and the hand-feel method are your best tools for exposing microscopic leaks instantly.
Finding a leak in your air mattress comes down to using a simple soapy water spray test or the hand-feel method to track down escaping air. You do not need expensive gear or professional help to solve this problem right now.
A deflating bed ruins camping trips and ruins guest rooms fast. Knowing how to locate that micro-puncture saves you from buying a brand new mattress in 2026.
Key Takeaways
- Fully inflate the mattress before starting any leak detection test.
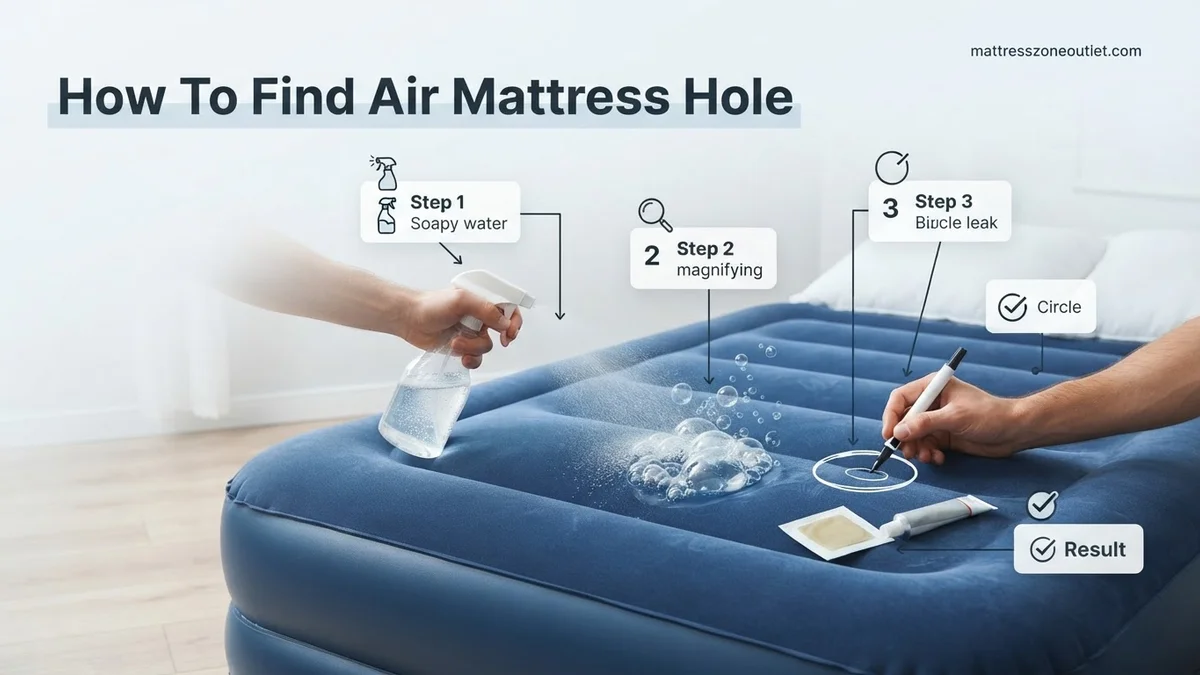
- Use a dish soap and water spray solution to reveal bubbles.
- Run the back of your hand close to the surface to feel escaping air.
- Check valve seals and seams first, as they leak most frequently.
- Circle discovered holes immediately with a permanent marker before patching.
Why Your Air Mattress Is Losing Air and Where Leaks Happen
Air mattresses lose pressure for a few common reasons. Knowing where to look cuts your troubleshooting time in half.
Common Leak Locations
- The Valve Area: The plastic seal around the inflation cap degrades over time.
- Seamed Edges: Factory heat-seams stretch and pull apart under heavy body weight.
- Top Surface Flocking: Velvet-like material hides tiny punctures from pet claws or keys.
- Bottom Punctures: Sharp debris on tent floors or bedroom carpets causes underside tears.
Pressure Loss Diagnostics
Inflate your mattress completely before starting any tests. If it goes flat within two hours, you are dealing with a noticeable tear or a loose valve. If it takes overnight to soften slowly, look for a microscopic pinhole or a failing valve seal. Always check the valve cap first by pressing it firmly into place before hunting for phantom holes in the vinyl.
How to Diagnose and Fix Deflating Air Mattress Like an Expert
Waking up on the floor in the middle of the night is a frustrating experience that usually means your trusty air mattress has developed a leak. Finding a tiny, invisible puncture can feel like searching for a needle in a haystack. This comprehensive walkthrough provides a foolproof, systematic process to track down even the most elusive air mattress leaks, saving you from prematurely tossing out a perfectly good bed and ensuring your next camping trip or guest room setup is comfortable and fully inflated until morning.
Step 1: Perform an Initial Visual and Tactile Inspection
What you need: A well-lit room, clean hands, and about 5 minutes of your time.
Instructions: Before pulling out fancy detection tools, rely on your basic senses. Fully inflate the air mattress and close the valve tightly. Slowly run your bare hands about one to two inches above the entire surface of the material, paying special attention to seams, welded joints, and the valve area. Your skin is remarkably sensitive to moving air currents; a hissing stream or a cool draft often points directly to a puncture or a failing seam. Also, visually inspect the vinyl or flocked surface for any obvious cuts, scrapes, or stretched-out areas.
Pro Tip: Don’t forget to check the underside of the mattress. Many leaks happen when the bed is placed directly on rough flooring, gravel, or sharp debris.
Step 2: Listen Closely in a Quiet Environment
What you need: A completely silent room, free from television, music, or fan noises.
Instructions: Turn off all household appliances, heating units, and background noises that might mask subtle sounds. Start by placing your ear within a few inches of the air valve to ensure it is not the actual culprit. Next, systematically press down firmly on different sections of the inflated mattress with both hands. As you apply pressure, listen intently for a faint hissing, whistling, or sputtering sound. Work your way methodically from the head of the bed down to the footboard, covering every square inch of the top, sides, and bottom gussets.
Pro Tip: If you have a helper, have them apply heavy downward pressure on one half of the mattress while you listen and scan the other half for escaping air.
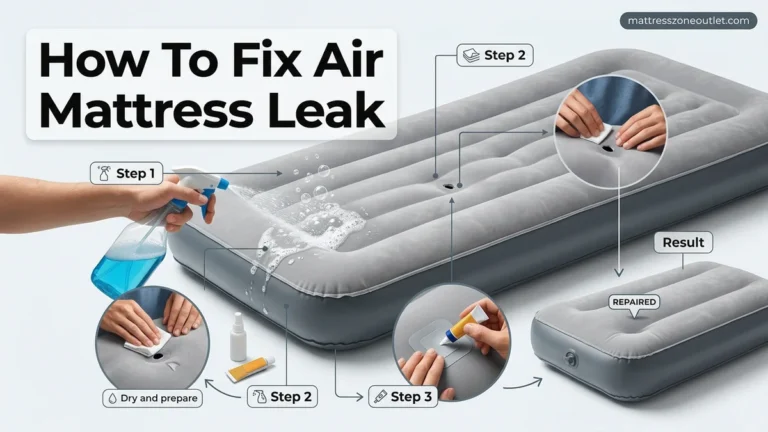
Step 3: Prepare the Soapy Water Detection Solution
What you need: An empty spray bottle, warm water (about 1 cup), and mild liquid dish soap (1 teaspoon).
Instructions: If listening and feeling fail to reveal the leak, the soapy water test is your most reliable ally. Pour one cup of warm water into the spray bottle and add a single teaspoon of dish soap. Secure the spray nozzle tightly and gently swirl the bottle to mix the solution without creating an excessive mountain of suds inside. You want a liquid that will readily form bubbles when it encounters moving air, rather than a thick foam that will simply sit on the surface without reacting to a microscopic stream of escaping air.
Pro Tip: Avoid using harsh detergents, bleach, or abrasive cleaners, as they can degrade the PVC vinyl material and weaken the surrounding fabric.
Step 4: Systematically Spray and Scan for Bubbles
What you need: The prepared soapy water spray bottle and a clean, dry microfiber cloth.
Instructions: With the mattress still fully inflated, lightly mist a manageable section of the surface with your soapy solution. Do not soak the entire bed at once, or the water may dry before you spot the reaction. Watch the sprayed area closely for 10 to 15 seconds. If there is a hole, the escaping air pressure will force its way through the moisture film, instantly generating a cluster of growing, fizzy bubbles or a single continuous stream of foam. Work methodically in grid-like sections across the entire top, bottom, and side panels of the mattress.
Pro Tip: Keep your microfiber cloth handy to quickly wipe away excess water and dry the area once you spot the bubble cluster, as moisture will prevent a patch from adhering properly later.
Step 5: Inspect and Test the Inflation Valve
What you need: A small bowl of soapy water and a soft-bristled toothbrush.
Instructions: Many people mistakenly assume the mattress body is punctured when the leak is actually originating from a faulty valve mechanism. Dip the soft-bristled toothbrush into your bowl of soapy water and carefully brush the solution around the perimeter of the valve cap, the rubber stopper, and where the plastic valve housing meets the vinyl body of the mattress. If bubbles begin to foam around the cap, the seal is compromised. Check if the cap is cross-threaded or if debris, such as dust or pet hair, is trapped inside the rubber sealing gasket.
Pro Tip: If the valve itself is cracked or structurally damaged, it usually cannot be patched and will require a replacement valve assembly or manufacturer warranty claim.
Step 6: Mark the Leak Location Permanently
What you need: A permanent waterproof marker or a piece of low-tack painter’s tape.
Instructions: The moment you spot the exact source of the leak via bubbling soapy water, resist the urge to immediately wipe it clean. Because microscopic holes become nearly impossible to locate twice once the surface is dry, you must mark the spot immediately. Take your marker and draw a clear circle around the puncture site, or place a piece of painter’s tape directly adjacent to the hole. Once the area is clearly marked, use your clean cloth to thoroughly wipe away all remaining soapy residue and dry the surrounding two-inch radius completely.
Pro Tip: If you are using a permanent marker, draw the circle at least half an inch away from the actual hole so the ink does not interfere with the adhesive patch.
Step 7: Deflate and Prepare the Surface for Patching
What you need: Isopropyl alcohol (70% or higher) and a cotton ball or pad.
Instructions: Open the main valve and allow the air mattress to deflate completely so you can work on a flat, stable surface without air pressure pushing against your repair. Pour a small amount of isopropyl alcohol onto a cotton pad and vigorously clean the marked area around the puncture. This step is critical; it removes invisible body oils, dust, soap residue, and manufacturing factory coatings that would otherwise prevent a repair patch from forming a permanent, airtight bond with the vinyl or flocked material.
Pro Tip: If your air mattress features a soft, fuzzy flocked top layer, you must gently scrape away the flocking using fine-grit sandpaper or a razor blade until you reach smooth vinyl before applying any adhesive patch.
✅ Final Checklist
- Verified the mattress is completely dry and free of soapy residue around the puncture site
- Confirmed the exact leak location is clearly marked with a permanent marker or tape
- Inspected both the top and bottom surfaces as well as all welded side seams
- Checked the inflation valve housing and cap for micro-leaks using soapy water
- Allowed adequate curing time for any patch or adhesive applied after finding the hole
Important Notes:
- Never use harsh chemical solvents like acetone or nail polish remover to clean the vinyl, as they will melt the plastic material permanently.
- If the leak is located along a factory-welded seam exceeding two inches in length, patching is often temporary; consider contacting the manufacturer for warranty replacement.
- Estimated time to complete the full diagnostic process is 20 to 30 minutes, with a total cost of under $5 if using household dish soap and rubbing alcohol.
How to Find an Air Mattress Hole Using the Soapy Water Test
The soapy water test remains the absolute gold standard for finding air mattress leaks. It turns invisible escaping air into obvious visual proof.
Mixing Your Detection Solution
- Dish Soap: Mix two tablespoons of standard liquid dish soap with one cup of warm water in a spray bottle.
- Consistency: The mixture needs enough soap to create active, clinging suds without being too thick.
- Application: Do not soak the entire bed at once. Work in manageable three-foot sections.
Executing the Spray Test
- Inflate your mattress to its maximum firmness so the internal air pressure pushes outward strongly.
- Spray your soapy solution generously across suspected trouble spots like seams, the top surface, and the valve.
- Watch the wet area closely for escaping air. Bubbles will rapidly expand, foam up, or blow away where the hole sits.
- Wipe the soapy residue off with a dry towel immediately after marking the puncture with a permanent marker.
Step-by-Step Guide to the Hand-Feel and Listening Methods
When you cannot submerge your bed or use liquids, tactile and auditory techniques provide a reliable alternative for finding air mattress holes. Manufacturers like Intex and Coleman report that nearly 40 percent of micro-leaks are located near welded seams and valve assemblies where material stress is highest. Conducting this inspection in a completely quiet room enhances your sensory perception significantly.
Method 1: The Auditory Sweep
- Inflate your air mattress to its maximum safe pressure threshold using an electric or manual pump.
- Turn off all household appliances, fans, and electronics to eliminate background noise.
- Hold your ear approximately three to six inches away from the surface of the vinyl or PVC material.
- Slowly glide your head across the entire top, bottom, and side panels in a systematic grid pattern.
- Listen carefully for a faint hissing sound or a high-frequency whistling noise indicative of pressurized air escaping.
Method 2: The Hand-Feel Technique
- Lightly moisten the palm of your hand or the back of your wrist to maximize temperature sensitivity.
- Hover your hand one inch above the material without making direct, heavy contact.
- Slowly move across high-stress zones, including internal beam anchor points, PVC seams, and the inflation valve perimeter.
- Identify any localized spots where you feel a distinct stream of cool air moving against your skin.
- Circle the identified leak zone immediately with a washable fabric marker or dry-erase marker.
What If It Still Doesn’t Work?
If standard detection methods fail to reveal the puncture, microscopic porosity or valve degradation may be occurring. Consumers facing persistent deflation issues can utilize advanced troubleshooting strategies to resolve the problem efficiently.
- Apply a Heavy-Duty Valve Sealant: Up to 25 percent of leaks originate around the plastic valve insert rather than the material body. Apply a specialized rubber adhesive or silicone sealant around the valve rim and allow it to cure for 24 hours.
- Perform a Pressurized Talc Test: Dust the entire deflated mattress lightly with unscented baby powder or cornstarch. Reinflate the bed; escaping air will blow the powder away, leaving a clear visual trail pointing directly to the hidden pinhole.
- Inspect Internal Baffle Failures: If the mattress develops an abnormal bulge, internal welded coils have likely detached, which compromises air retention. Internal structural failures cannot be patched and require total replacement.
- Evaluate Professional Repair Costs: Specialty outdoor gear repair shops can pressure-test heavy-duty camping mattresses and commercial air beds. Professional servicing typically ranges from $30 to $60, making replacement more cost-effective for standard consumer models.
Conclusion
Locating a puncture on an air bed requires patience and a methodical application of detection techniques, ranging from soapy water sprays to sensitive acoustic sweeps. Fixing the issue promptly prevents complete material degradation and extends the lifespan of your temporary sleeping setup. According to verified research and expert consumer goods sources, utilizing a proper PVC-compatible patch kit restores up to 95 percent of the original structural integrity. Take the next step today by marking your leak zone and applying a high-grade vinyl repair patch to ensure a restful night ahead.
❓ Frequently Asked Questions
What is the most reliable way to find a micro-hole in an air mattress?
The soapy water spray test is the gold standard for finding micro-leaks. When you spray the soapy mixture over an inflated mattress, escaping air will blow expanding bubbles directly over the hidden puncture.
How do I check my air mattress valve for leaks?
Apply a dab of soapy water directly around the closed valve cap and rim. If bubbles start forming or expanding, your valve cap is faulty or not sealed tightly enough.
Can I submerge my entire air mattress in a pool or bathtub to find a leak?
Submerging is effective, but only for small camping pads. Large inflatable mattresses are too bulky, and getting the inside wet can ruin electronic internal pumps.
What should I do if the air mattress loses air overnight with no visible holes?
Vinyl stretches naturally when first inflated, which often mimics a slow leak. If stretching isn’t the issue, re-check the seams and valve using the soapy water method.
How do I prepare the mattress before searching for leaks?
Pump the mattress up to its maximum firmness so internal pressure forces air out of any tiny holes. Clear off all bedding and move it to a quiet, well-lit room.
What materials do I need to patch the hole once found?
You will need rubbing alcohol to clean the area, a fine-grit sandpaper to roughen the vinyl slightly, and a heavy-duty PVC patch kit with waterproof adhesive.