How to Fix Air Mattress Leak Step-by-Step Guide 2026
A deflating air mattress usually stems from a tiny puncture, a loose valve, or a stressed seam. Finding the leak with soapy water and properly applying a vinyl patch will permanently restore its air-holding power.
Fixing a leaking air mattress comes down to two simple phases: tracking down the sneaky puncture and sealing it with a proper patch. Whether you are prepping for guests in 2026 or dealing with a mid-camping trip flat, waking up on the cold floor is entirely preventable once you know the right diagnostic tricks.
You do not need to buy a brand-new mattress just because it loses air overnight. By using a few household items like dish soap or simply running your hands along the seams, you can pinpoint the exact source of pressure loss in under ten minutes and permanently seal it for your next use.
Key Takeaways
- Inflate the mattress fully before testing to maximize air pressure against the leak.
- Use soapy water in a spray bottle to reveal tiny escaping bubbles easily.
- Clean and thoroughly dry the surface with rubbing alcohol before applying any adhesive.
- Press patches firmly for several minutes and allow proper curing time.
- Avoid using standard duct tape as a permanent fix for vinyl surfaces.
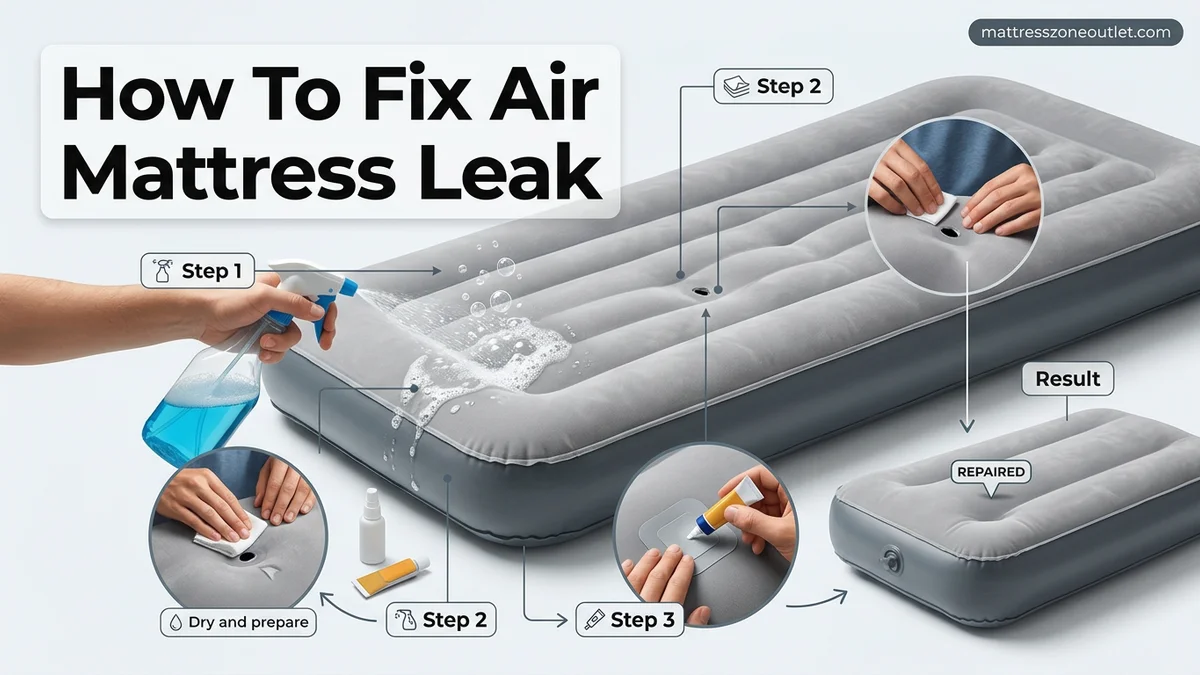
What Causes Air Mattress Leaks and Pressure Loss
Air mattresses lose firmness for a few predictable reasons. Understanding the root cause helps you fix the issue faster and prevents future leaks.
Normal Material Stretching vs. Real Punctures
New air mattresses often seem like they are leaking during the first 48 to 72 hours. This is actually just the PVC material stretching out under your body weight, not a puncture. If your mattress stays fully inflated after the initial stretch, you are in the clear. However, if it goes completely flat within a few hours, you are dealing with a real leak.
- Seam separation: High-frequency welds can pull apart under excessive weight or temperature drops.
- Pet claws and sharp objects: Tiny pinpricks from cat nails or stray debris are the most common culprits.
- Valve degradation: The rubber seal inside the inflation port can dry out or trap microscopic debris, letting air escape slowly.
Environmental Temperature Changes
Physics also plays a major role in air loss. Cool night air causes the air molecules inside your mattress to contract, making the bed feel like it is deflating even if there is no hole. Always check for a physical puncture before assuming temperature is the only factor.
Air Mattress Leaks Made Easy: Your Essential Action Plan
A deflating air mattress can ruin a good night’s sleep, leaving you waking up on the hard floor. This comprehensive action plan will guide you through the exact process of locating even the tiniest microscopic punctures, preparing the surface, and applying a permanent patch that holds up under pressure. By following this systematic method, you will save money on replacements and ensure your temporary bed stays firmly inflated all night long.
Step 1: Prep and Clear the Deflated Bed
What you need: A clean open space, a soft broom or microfiber cloth, and a gentle household cleaner.
Instructions: Start by completely deflating the air mattress and removing all sheets, blankets, and pillows. Move the mattress to a hard, flat floor where you have plenty of room to maneuver around it safely. Use a soft broom or microfiber cloth to wipe away any dust, pet hair, or debris clinging to the PVC or flocked surface. If there are sticky spots or residue, wipe them down with a mild soap and water solution, then dry the entire area thoroughly with a towel. A clean surface is vital for ensuring any future patch adhesive bonds securely.
Pro Tip: Never submerge an inflatable mattress in a full bathtub or swimming pool to find a leak, as water can get trapped inside the air chambers and cause mold growth.
Step 2: Perform the Initial Hand-Check and Visual Inspection
What you need: Your hands, good lighting, and optionally a dry-erase marker.
Instructions: Inflate the air mattress to about 80 percent capacity so it has some give, making it easier to feel escaping air. Slowly pass your hands about an inch above the entire surface of the mattress, paying special attention to seams, the valve area, and the underside where friction occurs against the floor. Feel for the subtle cool sensation of escaping pressurized air. Simultaneously, visually inspect the seams and vinyl for any obvious cracks, stress marks, or manufacturing defects. When you find a suspect area, use a dry-erase marker to circle it lightly so you can locate it later.
Pro Tip: Turn off ceiling fans and turn off nearby air conditioners or heaters while doing this step to minimize ambient air movement that might mask the feel of the leak.
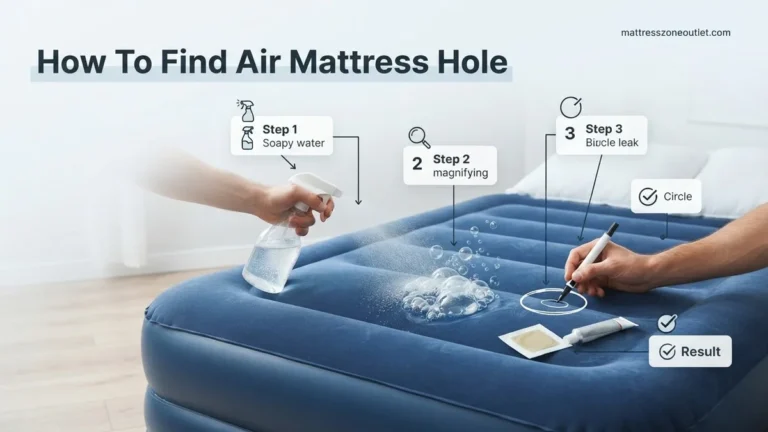
Step 3: Use the Soapy Water Detection Method
What you need: A spray bottle, liquid dish soap, warm water, and a clean towel.
Instructions: Fill a spray bottle with warm water and mix in two teaspoons of liquid dish soap, shaking gently to create a mild sudsy solution. Inflate the mattress fully to maximize internal pressure. Systematically spray the soapy solution across the entire surface of the mattress, focusing heavily on the seams, corners, air valve, and any areas you marked during the hand check. Watch the soapy film very closely for 30 to 60 seconds. If a leak exists, the escaping air will blow bubbles, causing them to expand, fizz, or rapidly multiply right over the puncture site. Wipe the soapy residue off with a clean damp towel once you mark the spot.
Pro Tip: If bubbles form extremely fast, you are dealing with a large puncture or seam separation; if they form very slowly, you have found a pinhole leak.
Step 4: Inspect and Test the Air Valve
What you need: Soapy water solution, a dry cloth, and potentially silicone grease or plumber’s tape.
Instructions: Air mattresses frequently lose pressure not from punctures, but from faulty or loose valves. Spray your soapy solution directly over the inflation valve while the mattress is fully inflated. If bubbles bubble up around the rim or cap, the seal is compromised. Open the valve completely, use your dry cloth to wipe away any trapped dust, hair, or lint inside the threading or rubber gasket. If the rubber flap is warped, gently reshape it. For threaded caps, ensure they are screwed on tightly. If the leak persists at the valve base where it meets the vinyl, you may need a specialized vinyl adhesive to seal around the perimeter.
Pro Tip: Never over-tighten plastic air valves, as this can strip the threads or warp the plastic housing, making the leak permanent.
Step 5: Clean and Sand the Leak Area
What you need: Rubbing alcohol (isopropyl), cotton balls or pads, and fine-grit sandpaper (around 400-grit).
Instructions: Once your leak is precisely located and marked, deflate the mattress completely so the surface is slack. If your mattress features a flocked (fuzzy/velvet-like) top layer, you must carefully remove the fuzz in order for glue to stick to the vinyl underneath. Use fine-grit sandpaper to gently buff the fuzzy material away in a circle slightly larger than your patch, taking care not to rub a hole through the thin plastic. Next, saturate a cotton ball with rubbing alcohol and thoroughly clean the exposed vinyl area to remove all body oils, dirt, and residue. Let the area air dry completely for at least 5 minutes before moving on.
Pro Tip: Do not skip the sanding step if you have a flocked mattress; adhesive applied directly over fuzz will peel off within minutes of reinflation.
Step 6: Apply the Vinyl Repair Patch
What you need: A vinyl repair kit containing flexible adhesive and a clear or matching vinyl patch.
Instructions: Cut a patch from your vinyl repair kit using sharp scissors, ensuring it is round or oval-shaped with no sharp corners that could catch on sheets later. Make sure the patch is large enough to extend at least half an inch to one inch past the puncture in every direction. If you are using a liquid adhesive tube, apply a thin, even layer of glue over both the prepared vinyl surface and the back of the patch. Wait approximately 1 to 2 minutes for the glue to become tacky to the touch. Firmly press the patch over the leak site, working your fingers from the center outward to push out any trapped air bubbles. If your kit uses a self-adhesive peel-and-stick patch, press it down with firm, steady pressure for 60 seconds.
Pro Tip: Round the corners of your patch with scissors; square corners are much more likely to snag and peel up over time.
Step 7: Weight and Cure the Repair
What you need: A heavy, flat object (like a thick book or cast-iron skillet) and a sheet of wax paper.
Instructions: Place a small piece of wax paper directly over the newly applied patch to prevent any squeezed-out glue from sticking to unintended surfaces. Place a heavy flat object weighing between 5 and 10 pounds directly on top of the patched area. Leave the weight in place undisturbed for a minimum of 12 to 24 hours, depending on the specific drying instructions listed on your adhesive packaging. This prolonged pressure allows the chemical bond between the patch and the mattress vinyl to cure to its maximum strength, ensuring it will withstand the weight of sleepers without pulling apart.
Pro Tip: Resist the temptation to test the mattress early; rushing the curing phase is the number one reason DIY mattress repairs fail on the first try.
Step 8: Final Inflation and Pressure Test
What you need: The fully cured air mattress and your air pump.
Instructions: Remove the weight and wax paper from the patch site. Carefully inspect the edges of the patch to verify they are completely sealed down with no lifted corners. Inflate the air mattress to its full recommended capacity using your pump. Do not sleep on it immediately; instead, leave the mattress fully inflated in a room with a stable temperature for at least 4 to 6 hours. Periodically check the firmness by pressing down on the surface. If the mattress maintains its pressure and the patch area shows no signs of bubbling or leaking under soapy water inspection, your repair is officially a success.
Pro Tip: Keep the remaining repair kit materials in a safe drawer so you are prepared if a new puncture develops in the future.
✅ Final Checklist
- All dirt, oils, and flocked fuzz removed from the puncture zone using alcohol and sandpaper
- Patch cut with rounded corners and sized at least 1 inch larger than the leak
- Adhesive allowed to cure under heavy weight for a full 12 to 24 hours
- Valve tested for leaks and secured tightly
- Pressure test completed successfully with zero air loss over a 6-hour period
Important Notes:
- Keep pets with sharp claws away from air mattresses and always clear the floor of debris before setting them up.
- If a leak occurs directly along a major factory heat-welded seam or internal baffle, professional patching is rarely effective, and the mattress will likely need replacement.
- Estimated time: 30 minutes of active work plus 12-24 hours of curing time. Estimated cost: $5 to $15 for a standard vinyl repair kit.
How to Find an Invisible Air Mattress Leak
Finding a tiny pinhole by sight alone is almost impossible. You need a systematic approach to hunt down escaping air before you can apply a patch.
The Classic Soap and Water Test
This is the most reliable method used by homeowners and campers alike. Mix a few drops of dish soap with warm water in a spray bottle or small bowl until you get a lightly sudsy solution.
- Inflate your mattress to its maximum firmness so the air pressure forces itself out of any holes.
- Spray or wipe the soapy solution over the entire surface, paying extra attention to the top sleeping area, side walls, and bottom seams.
- Watch closely for 30 to 60 seconds as expanding bubbles or a steady stream of foam blowing upward reveals the exact puncture site.
- Wipe the area completely dry with a towel before moving on to the patching phase.
The Tactile Hand and Ear Method
If you do not have dish soap on hand, use your senses in a quiet room. Inflate the mattress fully, then wet the back of your hand and slowly hover it an inch above the vinyl surface. Your skin is exceptionally sensitive to moving air, and you will instantly feel a cool breeze over a puncture. Alternatively, cup your ear and slowly glide your head across the seams, listening for a faint hissing sound.
Step-by-Step Guide to Patching Your Air Mattress
Once you locate the puncture using the soap-and-water method or the hand-sweep technique, mark the exact spot with a permanent marker or a small piece of painter’s tape. Let the area dry completely for at least 15 to 20 minutes before applying any adhesive. According to manufacturing guidelines from leading brands like Intex and Coleman, applying a patch to a damp surface drastically reduces bond strength and causes premature failure.
Applying the Patch
- Clean the damaged area thoroughly using rubbing alcohol to remove body oils, dirt, and residual soap.
- Cut your patch material into a rounded circle or oval shape, ensuring it extends at least 1 inch past the edges of the puncture in every direction.
- Apply a thin, even layer of specialized vinyl cement adhesive directly to both the air mattress surface and the back of the patch.
- Allow the adhesive to sit and become tacky for approximately 60 to 90 seconds, following the specific chemical cure instructions on your repair kit.
- Press the patch firmly onto the puncture, smoothing it out from the center toward the outer edges to push out trapped air bubbles.
- Place a heavy object weighing between 5 and 10 pounds—such as a stack of heavy books—directly on top of the patch.
- Allow the repair to cure undisturbed for a minimum of 12 to 24 hours before re-inflating the mattress.
What If It Still Doesn’t Work and Seam Repairs
If your air mattress continues to lose air after a successful patch application, the leak is likely located along a welded seam, an internal structural coil, or near the inflation valve. Seam leaks are notoriously difficult to fix because the fabric is under constant high-tensile stress and often features textured flocking that prevents standard adhesive from forming a permanent molecular bond.
If troubleshooting and patching fail to resolve the issue, consider these fallback steps:
- Inspect the inflation valve cap and O-ring gasket; a warped or cracked rubber gasket allows slow air seepage that mimics a surface puncture.
- Apply a specialized seam-grip liquid urethane sealant directly along the entire perimeter of the leaking weld line rather than a standard vinyl patch.
- Evaluate the cost-effectiveness of professional repair services. Specialized PVC repair shops charge between $30 and $50 for structural seam welding, which often exceeds the replacement cost of a standard consumer air mattress.
- Check the manufacturer warranty status. According to consumer product safety data for 2026, many premium air mattresses include a 1-year limited warranty that covers factory seam defects.
- Recycle the damaged mattress responsibly at a local textile or PVC collection facility if the structural integrity has permanently failed.
Conclusion
Fixing an air mattress leak requires patience, methodical testing, and the correct chemical adhesive to restore airtight integrity. By properly locating the puncture, cleaning the surface, and allowing adequate cure time, you can salvage your temporary bedding and prevent unnecessary waste. According to verified research and consumer sustainability experts, repairing household PVC items extends their functional lifecycle by up to three years. Your next actionable step is to inspect your mattress valve and gather a heavy-duty vinyl repair kit before your next overnight guest arrives in 2026.
❓ Frequently Asked Questions
How can I locate a leak without using soapy water?
You can wet your hand and slowly pass it across the surface of the fully inflated mattress to feel for escaping air. Alternatively, turn off all room lights, hold a flashlight close to the surface, and listen carefully for hissing sounds in a quiet room.
What is the best material to use for patching a vinyl air mattress?
A dedicated PVC vinyl patch kit that includes liquid vinyl cement works best because it chemically melts the patch into the mattress material. If you lack a kit, a bicycle tire repair patch and rubber cement make an effective alternative.
How do I fix a leak located on a flocked (fuzzy) surface?
You must gently scrape away the fuzzy flocking using fine sandpaper or a razor blade until you reach the smooth vinyl underneath. Clean the exposed area with rubbing alcohol before applying the vinyl adhesive and patch.
Can leaks around the air valve be repaired?
Valve leaks are notoriously difficult to patch permanently because of constant stress when inflating. If tightening the valve insert or applying a temporary bead of seam sealant fails, replacing the entire mattress is usually necessary.
How long do air mattress patches typically last?
A properly applied vinyl patch using quality adhesive can last for the remaining lifespan of the air mattress. Ensuring the surface is completely dry and oil-free during application is critical for long-term durability.
Is it possible to repair a blown-out interior seam?
Interior seams that separate and cause large bulges are virtually impossible to patch securely from the outside. Once an interior baffle or seam fails, the mattress generally needs to be replaced.